Part 1: Django, Docker, and AWS Elastic Beanstalk
A Beautiful Combination of Speed, Standardization, and Scalability

Click here to see Part 2 of this series. Part 3 is available here.
Django, Docker, and AWS Elastic Beanstalk (EB) are 3 services which I have come to rely heavily on as a developer. However, combining the three to run a Django app in a Docker container on Elastic Beanstalk was more of a headache than I bargained for. Like most technical problems on AWS, the documentation was mostly useless, and StackOverflow provided amalgamation of half-answers to burning questions I had about Docker deployments. Depending on your scenario, this blog post might be a half-answer as well, but I am going to do my best to show how I managed to deploy Django + Docker locally and then Django + Docker + Elastic Beanstalk on a production environment.
Django is a Python-based web service framework which is fantastic for its ability to be rapidly developed, scaled, and supported with hundreds of open-source libraries. Docker can be thought of as a headless virtual machine, allowing you to run an image of any operating system and all the pre-installed system libraries that your app needs. Docker is particularly useful for standardizing your development environment and negating the difficulties of software support for all of the various computers and operating systems your developers work on and your servers run on, meaning that if it generally works on one machine, it will work on all machines. Finally, AWS Elastic Beanstalk is a managed, scalable web service platform, providing the ability to spin up or trim servers automatically as your service gains or loses traffic and allowing you to deploy new code from your own terminal in as little as one line of code. Combined, you have a very maneuverable web service running on a standardized environment in the cloud where it can be automatically managed, saving you and your organization tons of time and money.
The Jargon
I’ll assume that you have some familiarity with starting a Django project and that you have Docker installed on your system (there are tons of tutorials elsewhere on this, I’m not doing anything here that is not standard practice). The following terms should help you navigate the rest of this post:
Dockerfile - A file you place in the root directory of your Django product that is literally just called
Dockerfile(no file extension on the end!). This will tell Docker how to “compile” the image of your chosen OS and project.settings.py - The settings file for your Django project, usually included in a folder (separate from your app) at the root of your Django project. The relative path to this file is a critical environment variable to make your project run.
Docker-compose - An additional Docker service that is used for running “multi-container” Docker services. Basically, this allows you to “stitch” together various containers into a coherent service. The multi-container nature of Compose would make it easy to manage a separated database Docker image and a Django Docker image. Here, we’ll just use it to make booting up the Django image easier. We’ll just stick with the local sqlite3 database (which will be embedded into the Django Docker image) for debugging locally and AWS RDS for running and managing the database in the cloud.
Docker Hub - A cloud repository for Docker images, much like GitHub.
PyCharm - The best IDE in the world. I recommend shelling out for the Pro version, which I’ll use for some of this tutorial.
Project Structure
Every good tutorial should have a project structure! I’ll refer back to this later on, so no worries if you’re confused by some of it for now.
ProjectRoot
 >.ebextensions
 >.elasticbeanstalk
 >project
 >app
 >static
 >Dockerfile
 >Dockerfile-base
 >docker-compose.yml
 >manage.py
 >requirements.txt
Quickly, .ebextensions contains files that dictate any special deployment instructions during the EB deployment process, such any Django database migrations or any instructions that may run on only the leader instance of your EB environment. project is where your settings.py lives, among other important files. app is the Django app you are building (you might have more than one of these folders depending on your specific setup). requirements.txt is where your Python library dependencies live, which we will install directly onto our Docker image instead of having EB do on deployment. You’ll notice that we have 2 Dockerfiles: Dockerfile-base and Dockerfile. We will actually build 2 different Docker images during this tutorial to make life a bit easier. The first will be a base “system” level image which will be based upon Amazon Linux 2 and will contain some geospatial Linux libraries that are important to my project. When we build this image, we will rename Dockerfile-base to Dockerfile and Dockerfile to something else, and then switch back when we are done.
Building the Base Docker Image
Building two images will simplify our process: a base “system” level image will contain our Amazon Linux 2 operating system as well as some special geospatial libraries which we will install with yum. Amazon Linux is fairly notorious for its lack of support for geospatial libraries, so we will work to compile this image and hope that we won’t have to change it for a very long time. We will add our Django project specific Docker components on a second image which we will write soon. Going back to our project directory above, I will rename Dockerfile-base (which is our base Dockerfile that we want to use to make this first image) to Dockerfile and Dockerfile to something else. My specific Dockerfile looks like this:
# Use Amazon Linux 2 OS Docker Image from Docker Hub
FROM amazonlinux:2

# gather dependencies important for geospatial installations
RUN yum -y update && yum -y install wget tar.x86_64 gcc-c++ make cmake bzip2 python3-devel openssl-devel && yum clean all

# need to install yum-config-manager
RUN yum -y install yum-utils
# enable Yum extended package repositories
RUN amazon-linux-extras install epel -y
RUN yum-config-manager -y --enable epel
RUN yum-config-manager -y --enable remi

# Define the Docker workdir
WORKDIR /app

# set environment variables
ENV PYTHONDONTWRITEBYTECODE 1
ENV PYTHONUNBUFFERED 1

# install Python dependencies
RUN python3 -m pip install --upgrade  pip

# install Yum packages
RUN yum -y install libtiff-devel
RUN yum -y install libjpeg-turbo-devel
RUN yum -y install sqlite-devel
RUN yum -y install gdal
RUN yum -y install gdal-python
RUN yum -y install geos
RUN yum -y install proj
RUN yum -y install libspatialite
RUN yum -y install libspatialite-devel
RUN yum -y install libcurl-devel
RUN yum -y install postgresql-devel
One quick note here: for some reason, this image builds just fine on my PC, but it seems to have been using an old version of the EPEL repository on my Mac which caused errors while building (I nearly threw up when I found out it was a GFORTRAN version issue). Whether this is because of some layer contamination or it truly was a system-level issue I have no idea, but I would bet on the former. All that matters though is that it compiles once, then it is virtually guaranteed to work anywhere.
Ok, so we have our base Dockerfile! However, something about this file might catch the eye of more sophisticated Docker users. When we eventually build it, we will find that the image is just over 5GB and compressed to 1.4GB! Looking at the standard Amazon Linux 2 Docker image, we’ll find that it has a compressed size of 60MB. Have we really just installed perhaps 4GB of libraries? What gives?! If we inspect the layers of the image we build from this exact Dockerfile, we’ll find that we have 22 layers, far too many! According to the official Docker documentation, every RUN command in our Dockerfile will create a new layer, which the next one will be based upon, and every new layer takes up more space. While 5GB isn’t the showstopper it used to be, we will find that AWS’s smallest-tier EB servers will run out of space downloading our image unless we manually bump the disk size. Because we want to save money, especially while testing, and we want to rapidly deploy our containers to new servers regardless, it is important to make our Docker image as small as possible. I recommend reducing the number of RUN commands to the bare minimum, unless you’re debugging each install.
It feels a bit like cheating, but we can chain together commands by using && and backslashes to continue commands onto newlines. The new Dockerfile looks something like this:
# Use Amazon Linux 2 Docker Image
FROM amazonlinux:2

# gather dependencies important for geospatial installations
RUN yum -y update && \
    yum -y install wget tar.x86_64 gcc-c++ make cmake bzip2 python3-devel openssl-devel && \
    yum -y install yum-utils && \
    amazon-linux-extras install epel -y && \
    yum-config-manager -y --enable epel && \
    yum-config-manager -y --enable remi && \
    yum -y install libtiff-devel \
    libjpeg-turbo-devel \
    sqlite-devel \
    gdal \
    gdal-python \
    geos \
    proj \
    libspatialite \
    libspatialite-devel \
    libcurl-devel \
    postgresql-devel \
    yum clean all && \
    python3 -m pip install --upgrade  pip

# Define the Docker working directory
WORKDIR /app

# set environment variables (important for making Django run)
ENV PYTHONDONTWRITEBYTECODE 1
ENV PYTHONUNBUFFERED 1
Let’s build this Docker image by navigating to the directory it is contained in and running the command docker build -t dockerhubuser/project:base, where dockerhubuser is your Docker Hub user name, and the the semi-colon denotes the “tag” (which you can think of as a version), which we will make base. After watching pretty terminal art go by for a couple of minutes and feeling like a badass hacker (while simultaneously praying that it doesn’t error out), we’ll find that our image compiles to 1.1GB, with 950MB being devoted to the libraries we just installed. Compressed, this is 422MB. Take a second to fudge on your resume that you reduced your company’s code size by 500%!
Assuming you are signed into the Docker dashboard and have your Docker Hub account connected, you’ll find an option to push your new image to Docker Hub…go ahead and do so, so that we can pull it for our next project-specific image.
Building the Django Project Docker Image
With our base Docker image living in the cloud, we can take a sigh of relief knowing that the AWS Linux 2 compatibility issues are behind us and there is nothing in the world that can take away our precious pre-baked OS image. Now, let’s integrate our Django project into the Docker image that we will eventually deploy on Elastic Beanstalk. Revert the Dockerfile naming switch we made above so that Dockerfile is the Dockerfile corresponding to your Django project. Mine looks like this:
# Use Base Image
FROM dockerhubuser/project:base

# copy requirements.txt to the Docker workdir and install all dependencies
COPY requirements.txt /app/requirements.txt
RUN python3 -m pip install -r requirements.txt

# copy project
COPY . /app/

# port where the Django app runs
EXPOSE 8000
# AWS Elastic Beanstalk wants port 80 open too
EXPOSE 80

# Use docker-compose to run the Django app
Much more visually appealing than our previous one! Notice that we’re using the the base image we just created as—just that—the base! We copy and install our requirements.txt file containing all of the Django and Python libraries you need to make your project work and then expose the port where Django runs so that we can make contact with our project. Build the image like we did above with the command docker build -t dockerhubuser/project:latest, where the latest tag is a conventional Docker naming convention used for the newest release of an image.
You might already be asking: but how do I make Django run now? If you’ve come across this post, you might have seen some people issuing boot-up commands directly in the Dockerfile. My personal preference is to leave the actual runtime commands to Docker-compose.
Enter: Docker-compose
As I mentioned above, the primary use of Docker-compose is to stitch together multi-container environments, but I prefer to use it as a way to insert runtime instructions outside of our container. Docker-compose requires a docker-compose.yml file to exist in the working directory. Mine looks like this:
version: '3.8'
services:
   web:
       build: .
       image: dockerhubuser/project:latest
       command: python3 manage.py runserver 0.0.0.0:8000
       ports:
           - 80:8000
A quick note: the name web defines the service, and you will see it used as a container name on runtime. You can change this to mostly anything you want, but I prefer web since we’re building a web app service. You’ll also notice that we defined a placeholder IP and port for Django to run after the runserver command. For those of you who have run Django outside of Docker, this was never necessary. However, my container runs but is inaccessible to the internet unless I add this. Go figure.
Alright, so with our fancy new file, we can go ahead and run the container locally. In your terminal, enter docker-compose up and—voilà!—it should boot up and be accessible on localhost like usual. Note that the Docker dashboard has a button on the container that allows you to boot up a CLI if you need to access your manage.py shell in the container for any reason, like to apply migrations.
Interlude: PyCharm Pro…and YOU!
Another question I had when starting was…how do I use my IDE to write code in the Docker container? If I have to use VIM in the CLI to edit the code…well…forget it. Luckily, PyCharm has a solution. While you won’t exactly write code in the container, you can certainly borrow your container’s Python interpreter! As a bonus, your remote interpreter this gives you access to all of the libraries installed in your container, keeping your environment nice and standardized on runtime and during active IDE debugging. It’s too good to be true! But how to do it?
Make sure that Docker is running and that your container is up. On the lower-right side of your screen, you'll find your Python interpreter settings:

Go to “Add Interpreter” and select “Docker Compose”. Keep “Docker” as your server and set your “configuration file” to your docker-compose.yml file. If your Docker container is running properly, you should be able to find your service under the “service” dropdown (web, in our case, defined in the docker-compose.yml file). We can skip the environment variables for now (we will set them later). Lastly, change your Python interpret to python3 (unless you’ve changed your PYTHONPATH in the image).
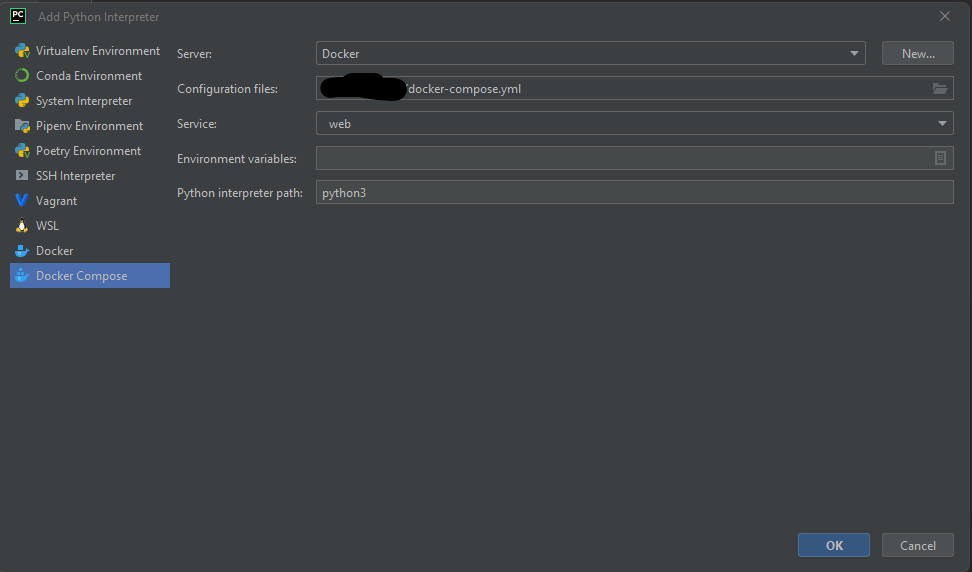
Click OK and sit back to let the magic happen. You’ll notice that PyCharm has downloaded a couple of images to help with the remote connection, which will appear in your Docker Desktop. However, your interpreter should now be registered and selected on the bottom-right of your screen. While you’re waiting for PyCharm to index your Docker container’s Python libraries, let’s go ahead and define a Django/Docker environment in PyCharm so that we can run the container and server from our IDE.
Go to File → Settings → Languages and Frameworks →Django. Checkmark “Enable Django Support” and then fill out the form. You’ll want to make sure your settings.py and manage.py paths are set correctly relative to your project root. Lastly, we’ll set some environment variables. Set PYTHONBUFFERED equal to 1 and DJANGO_SETTINGS_MODULE equal to the path of your settings.py file from the root directory (but leave out the .py extension!)

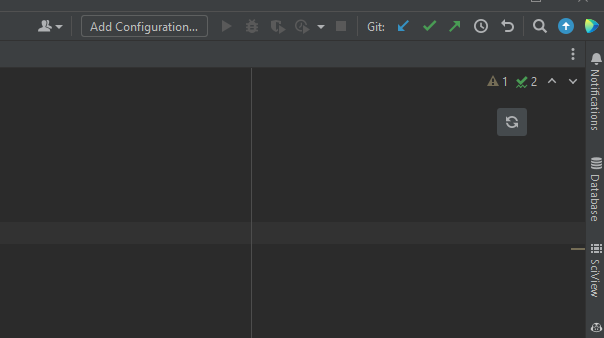
Great, now PyCharm will be able to run the server from inside itself. Let’s set up a new configuration to finish this process off. On the top-right of your screen, click the “Add Configuration” option and add a new configuration under “Django Server“:
Then, add 0.0.0.0 as your host, 8000 as your port, and then use the same environment variables above that we used for setting up the Django environment. Make sure that your remote Docker container Python interpreter is selected, and then press Apply and OK.

Now, the little “play” buttons should be active, and when clicked, your container should attach to your IDE and your server should run! As usual, the server will be restarted when code changes are made, making debugging Django easy as usual!
A Note on .ebextensions
The .ebextensions folder at the root of your Django project contains enumerated files that allow for sequential execution of commands and tasks before your app is deployed. This is ideally where you’d deploy Django commands like migrate, async tasks through Celery, an HTTPS rewrite engine, special server logging instructions, and some instance metadata. It is important to define a Django.config file in this instance which contains the following WSGI path in order to make your server work:
option_settings:
  aws:elasticbeanstalk:container:python:
    WSGIPath: project/wsgi:application
  "aws:elasticbeanstalk:container:python:staticfiles":
    "/static/": "static/"
This defines the path to your wsgi.py file and your static files. Notice that in the upgrade from AWS Linux 1 to AWS Linux 2, the format of the WSGI path has changed. You now remove the .py extension and add a :application tag. Make sure that this folder is embedded into the image that you deploy to Elastic Beanstalk in the Django project root.
Facing the Beast: Deploying to AWS Elastic Beanstalk
Welcome to hell: where your container runs on EB but you can’t connect and have no idea why. Let’s walk through this process together, noting that your specific configurations might cause additional (or less!) issues. I’ll assume that you have successfully created an environment on AWS Elastic Beanstalk, with “Docker” being the desired platform version.
Traditionally, new code is deployed to your EB instances as a zip file created when you run eb deploy ENVIRONMENT_NAME from the EB CLI. However, we can simply the process by simply uploading the docker-compose.yml file and using the AWS Elastic Container Registry (ECR) to host your Docker image. You might be able to get away with saving some storage costs by just using your repository from Docker Hub, but mine live in private Docker Hub repos and I’m far too lazy to figure out the permission issues that are bound to follow. After setting up a new ECR repo to host our Docker images, we can just the following commands to push our image to the ECR repo from our terminal (note that this requires the AWS CLI be installed, which is separate from the EB CLI). If you have problems with these commands, you can find more help on the one useful AWS documentation page in existence.
# log into AWS ECR, replace URL with the URL to to ECR
# assumes you are using AWS East 1 region

aws ecr get-login-password --region us-east-1 | docker login --username AWS -- password-stdin URL

# next, tag your image
# again, replace URL, but this time with your repo name
docker tag dockerhubuser/project:latest URL:latest

# now, push your image to ECR
# one last time, replace URL
docker push URL:latest
After watching more pretty terminal art, your Docker image will have been uploaded to ECR!
Now, it’s time to push to Elastic Beanstalk. From what I’ve read, the ability of AWS Elastic Beanstalk environments running Docker to accept docker-compse.yml files instead of the more proprietary Dockerrun.aws.json is a rather new feature, so we’ll just skip adding an additional file and just use our trusty docker-compose.yml file. This is where I recommend keeping a “debug” version of docker-compose.yml and a “production” version of the file. In the production version, you should point docker-compose to the image stored in ECR. Here is my production version of docker-compose.yml:
version: '3.8'
services:
   web:
       image: URL:latest
       command: python3 manage.py runserver 0.0.0.0:8000
       ports:
           - 80:8000
Where you should replace URL:latest with the URL of your ECR docker image from the previous code block. Now, we will deploy this docker-compose.yml to the EB environment. There may be a more graceful method for the process that I am about to use, and I will update this article if I discover one.
Navigate to AWS Elastic Beanstalk, go to your environment, click “Upload and Deploy”, and go to the “Application Versions“ page. Upload your production version of docker-compose.yml and then deploy it to your EB environment. After a few minutes, your app should be accessible via your custom EB url!
A few tips. First, if you are getting 502 Gateway errors, this is likely a misconfiguration of your proxy server: make sure that you opened the right ports in both Dockerfile and docker-compose.yml. Secondly, make sure that your EB url is included in the ALLOWED_HOSTS list in your Django settings.py. Secondly, every time you update your latest image in ECR, you’ll need to re-deploy the docker-compose.yml file to your EB environment. Like I said, there is probably a more graceful way to accomplish this, but this is enough headache for one day. Additionally, if you still have problems, you might need to set a DJANGO_SETTINGS_MODULE environment variable in the Elastic Beanstalk environment configuration. Go to your environment on the EB dashboard → Configuration → Software → Environment properties and then add DJANGO_SETTINGS_MODULE with a value of project.settings, or whatever path to your settings.py file (see our PyCharm Pro tutorial above).
Mission Accomplished!
Django, Docker, and Elastic Beanstalk have the potential to be a powerful combination. We successfully deployed a Docker image with Docker-compose running Django to an Elastic Beanstalk environment. We simply used a local database, but setting environment variables to connect it to an RDS database is fairly straightforward. I hope you’ve found this useful. As always, leave comments if you have issues and, more importantly, advice or corrections!
Addendum I: SSH’ing into your Elastic Beanstalk Docker Image
If you need to access the bash shell of your Docker image while in production on Elastic Beanstalk (e.g. to run a command with manage.py, you’ll need to follow some special instructions.
First, ssh into your environment using the ebcli in the project directory. From the SSH shell, run docker ps. You’ll find that you can’t see running Docker containers due to permission issues! Switch to superuser by entering sudo su -. Then, run docker ps again. You should now see your image running. Taking the container ID (the first column), you can then run docker exec -it <Container ID> bash to get the shell (additionally, you can run docker logs -f <Container ID> if you just need logs). After running this command, you should now be sitting in the root of your Docker image and can easily navigate to manage.py or call bash commands from within your container. Additionally, we can also run docker inspect <Container ID> to gather metadata about our deployed Docker container, including environment variables accessible to our Docker container.
Addendum: RDS and Celery
As you can see above, I wrote that adding the RDS database would be “fairly straightforward.” I’m sorry, friends, but this was not the truth. Moreover, implementing Celery was a complete disaster. I’ve written a Part 2 to this article for more information on how to accomplish this.